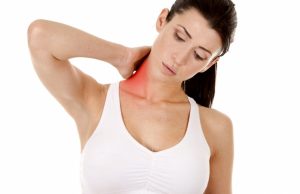
 More and more modern people complain of pain in the neck. Practice shows that the blame for everything, among other things, a sedentary lifestyle. Of course, daily work at the computer does not contribute to good health: our body is tired of this static and very strongly overexerted. So, what do we usually do when, after spending the whole day sitting at the computer, we understand that the neck is stale? We begin to bend it from side to side, making head unimaginable movements. But this does not bring the expected effect: the neck is still tense, and the aching pain already creeps up to it. In addition, the tension of the muscles of the neck will necessarily accompany the tension of the facial muscles. So, creases, wrinkles and tired look are assured. Why aren’t standard exercises to relax the neck as helpful as we expect them to be? The thing is that the approach to stretching the neck itself without taking into account all the other parts of the body is not effective. Here you are offered to try a very simple and effective set of exercises that you can do at home and in the office. The course is divided into 3 stages.
Contents
- Stage number 1: Find out more about how your neck muscles work
- Stage number 2: Stretch the whole body muscles from feet to neck gradually
- Stage number 3: Complete the relaxation complex doing special exercises for the neck
- Top-9 Incredibly Effective Exercises from Chinese Healers
- Video
Stage number 1: Find out more about how your neck muscles work
 We pay great attention to body tone and facial skin care. But very often we miss a very important element in preserving beauty and youth – caring for the neck.
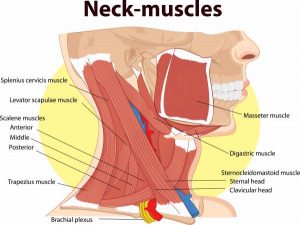
Muscles of the posterior surface of the neck are very powerful and strong, and pain as a result of overexertion occurs most often in them. But do not forget that the neck exists in the body not in itself, but being a part of our body. The muscles of the posterior surface of the neck are part of the posterior superficial muscular chain. It starts at the tips of the toes, goes further along the sole, goes into the gastrocnemius muscle, into the muscles of the hip flexor, then into the gluteus muscle, the muscle that straightens the spine, and extends along the spine to the skull. The integrity of this line is ensured by the fact that in the places of attachment of the muscles there are fibers that move from one muscle to another and bind them into a single formation.
Important facts you should know about your neck:
- The subcutaneous muscle of the neck, or platism, is responsible for the appearance of the neck and chin. It is different from other muscles and is highly prone to age-related changes and external injuries. Platism is not connected to the bone tissue and, like all muscles, has a tendency to lose elasticity.
- The skin of the neck contains less sebaceous glands than the face. The lack of sebaceous glands makes this area very prone to dryness and wrinkle formation. Therefore, it is very important to apply moisturizing creams not only to the skin of the face, but also to the skin of the neck.
- Age changes are primarily manifested in the weakness of the subcutaneous muscle of the neck. But the changes in it often lead not to the formation of the second chin but to the sagging of the skin by the “turkey” type.
- Over time, there is also an accumulation of adipose tissue in the lower parts of the cheeks and the chin area. This leads to the appearance of circular folds on the skin, it becomes flabby and wrinkled. One of the main causes of deterioration in the quality of the skin of the neck is a wrong posture. Since in real life we often look to the ground rather than to the sky, there is practically no work in platinum. And from forced inactivity, it weakens, becomes sluggish, sags and ceases to tighten the skin.
Important: Therefore, if the neck hurts, this does not mean that the problems are only in the neck. The entire superficial muscular chain is strained. Just the neck in this whole chain represents the weakest point. And, of course, in order to relax the neck, you need to work on all links of this chain: by relaxing each site, you can use the entire chain simultaneously. Only this will bring a tangible result.
Back
Stage number 2: Stretch the whole body muscles from feet to neck gradually
 This complex of exercises is most effectively performed in this order, stretching all the muscles of our body from feet to neck gradually. Exercises are very simple, you can do them anywhere, even at work. You do not need a rug or a special sportswear. The only thing you need is your body and 10 minutes of free time.
- Start from the feet: In order to relax the feet, you need to vigorously and very vigorously rub them: mash the entire foot and rub it hard with your fist. This is a good technique to relax the plantar aponeurosis. If you have already returned home, go barefoot on a massage mat or intensively roll with a stop pin. Hot bath for feet will warm the feet 100%. Relaxing your feet, you will immediately feel relief in the neck.
- Continue with your shins: To stretch the gastrocnemius muscle, stand facing the wall, rest in it with your hands, and legs set back so that between the foot and the shin an acute angle is formed. For this, the shin should be tilted forward. Alternately bending each knee, stretch the gastrocnemius muscle. For sure, you saw how athletes stretch their leg muscles before the distance. You need to do the same. When performing the exercise, there must be a clear feeling of stretching of the lower leg.
- Proceed with the back of the thigh, buttocks and back: This simple exercise will help simultaneously stretch three sections of the muscular chain leading to the neck – hip flexors, gluteus muscles, and a muscle that straightens the back. To do this, stand up and lean forward. Do not try to get the palm of the floor, bend as much as you feel comfortable. Make sure that your knees are straightened. Stay for a while in this position, feeling like your muscles are stretching.
- Finally relax your neck: Without leaving the previous position, standing in a slope, try to relax your neck as much as possible and move your head from side to side. You have to imagine that it is a pendulum, or that this is a head hanging on a thread-neck. As a result, thanks to your relaxed movements and weight, which a head has, the muscles of the neck will stretch and relax.
Important: Exercises offered in this complex are absolutely safe. They act very gently and never give any side effects, while having very high efficiency. When you thus work through the entire back muscular chain, you will feel great relief.
Back
Stage number 3: Complete the relaxation complex doing special exercises for the neck
 The following exercises will lead the whole complex to completion and you will be able to get the maximum effect from independent work on neck relaxation. However, these exercises can be used separately, but in combination with stretching the whole body, the effect will be more noticeable. Exercises for the subcutaneous muscle of the neck can be found below.
Exercise number 1:
- Smile, straining the lower face for 5 seconds
- At the same time relax the muscles
- Repeat for a minute
Relaxation of the muscle, lowering the corner of the mouth, gives an effective result in the form of raising the corners of the lips and changes the facial expression to a more positive one. And by straining also to platinum, you redistribute muscle activity and pull up the muscle itself.
Important: When doing such an exercise, remember that the main thing is regularity.
Exercise number 2:
- During breath, lower the lower lip and jaw so that the tension of the subcutaneous muscle of the neck is maximized, and the tendons clearly appear on the neck
- Relax all other facial muscles
- Stay in this position for about 6 seconds and completely relax your neck while exhaling
Important: Repeat the exercise 4-5 times with interruptions of 2-3 seconds between the tension periods.
Exercise number 3:
- Tilt your head forward
- Push your palms forward on the chest at a level of 3 ribs
- Then inhale, fixing the skin on the ribs with your fingers
- Slowly lift up and take your head back, thus causing tension in the subcutaneous muscle of the neck
- When exhaling, put your head in a vertical position
- The whole cycle of movements should be done for 3-6 times
- Inhale slowly through the nose and, opening your mouth wide, throw your head back to the limit
- Then, keeping the position of the head reclining back and making an exhalation through your nose, close your mouth slowly, bringing together the lower jaw and the upper one.
Important: Returning your head to a vertical position, rest for 2-3 seconds. Repeat this exercise 36 times.
Exercise number 4:
This exercise is called Simhasana, which means the pose of a lion:
- When the tongue protrudes, its muscles are activated, as well as the rectus abdominis muscle
- The muscles of the pelvic floor and the muscles attached to the sternum
- A strong exhalation activates the diaphragm, pelvic floor muscles and muscles that control the vocal cords
- At the same time, the subcutaneous muscle of the neck is also contracted.
As a result, Simhasana stimulates many muscles, which are usually not given enough attention.
Important: In addition, Simhasana has a tonic effect on the subcutaneous muscle of the neck, which gives a good cosmetic effect.
Exercise number 5:
- Inflate your cheeks as hard as you can
- Then close your mouth and start moving the air in a circle – from the left cheek above the upper lip to the right cheek and from beneath the lower lip to the left cheek
- Then gently tilt your head back and start gently blowing air
Imagine if you blow off a speck of dust. Repeat 3-5 times.
Important: Do these exercises every day, and soon you will notice the result: you will have a beautiful and tight neck.
Exercise number 6:
Stretch the lateral surface of the neck:
- The starting position is standing, pulling one arm downward, while pulling the head in the opposite direction. For example – the left hand down, and the head – to the right.
- You should clearly feel the tension of the muscles of the left side of the neck.
- Keeping the tension, smoothly change the position of the head, tilting slightly forward and slightly back to stretch all fibers of the muscles of the lateral surface of the neck.
Important: You should repeat this exercise with the opposite side of the body.
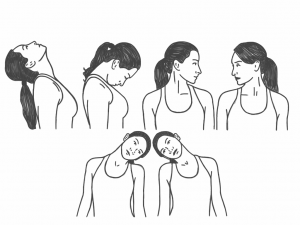
Exercise number 7:
Stretch the anterior surface of the neck:
- The starting position is standing
- Only now both hands must be pulled down and slightly forward
- The head should be thrown back and the top should be aimed downwards.
Important: Repeat this exercise three times to have the better effect.
Exercise number 8:
Stretch the posterior surface of the neck:
- Collect hands in the castle
- Put them on the back of the head
- On exhalation you should lower your head a little
- Try to lift it back with inhalation, but prevent this by hands
- Then exhale – and again lower your head
You should repeat this exercise until the head is at the lowest point. Then you should take off your hands very slowly and straighten yourself
Important: Do this exercise carefully. After that, pull the front surface of the neck again.
Back
Top-9 Incredibly Effective Exercises from Chinese Healers
 Almost everyone who spends a lot of time at work in the same position, sitting at the computer, experiences discomfort in the neck – unpleasant crunching, pain, sometimes a slight burning sensation. To remove these symptoms, Chinese healers, known by the fact that they resort to medicines lastly, are advised to perform a small complex, which includes 9 exercises. They are simple, but incredibly effective.
To improve the effectiveness of the exercises, the turns and tilts of the head accompany the movement of the eyes in the same direction. Do the exercises smoothly and slowly. Sit on a chair, keep your back and head straight.
- Pressure forward: Deeply inhale, put your hands on your forehead and press, while straining your neck and not letting your head lean back. Hold your breath and keep the voltage for 5-7 seconds. On exhalation, lift the palms of your forehead and relax for 10 seconds, dropping your head on your chest. Repeat 3-5 times.
- Pressure back: Take a breath, put your hands in the lock and press on the back of your head. At the same time, strain the cervical vertebrae and do not let your head fall. Hold your breath and stay in this position for 5-7 seconds. On exhalation, lower your arms and relax for 10 seconds. Repeat 3-5 times.
- Pressure to the sides: Inhale, press the left palm on the temple, trying not to succumb to pressure for 5-7 seconds. Exhale, completely relax the muscles of the neck and shoulders, rest for 10 seconds. Do the same with your right hand. Repeat the exercise 3-5 times with each hand.
- Bending backwards: With your hands, grasp the neck from behind, on inhalation – take your head back, overcoming resistance, and raise your eyes as high as possible. Hold your breath and keep the neck muscles tight for 5-7 seconds. On exhalation, lower your head and hands. Relax for 10 seconds.
- Bending forward: The palms press on the neck, and it gradually succumbs to this pressure. On inhalation, the head falls as much as possible on the chest. The chin is pressed to the neck, eyes are looking down. Keep the tension for 5-7 seconds. Exhale and relax.
- Turn to the left and to the right: At the inspiration, smoothly turn your head to the left, straining your neck muscles, and try to look as far as possible to the left. Hold your breath and strain for 5-7 seconds. Exhale, relax for 10 seconds. Repeat 3-5 times in each direction.
- Lower your chin to your chest: Relax your neck muscles by trying to lower your chin to your chest gradually increasing the amplitude of the movements. Repeat 10 times.
- Throw your head back: Relax your neck muscles by trying to scratch the back of the neck with the back of the head. Repeat 20 times.
- Relax, lower your shoulders: Slowly inhale, stretch the top of the head as far as possible trying to stretch the cervical vertebrae as much as possible. Turn your head to the left and to the right at the same time. Exhale, relax. Repeat 5 times.
Important: These exercises help to get rid of neck pain, dizziness, headache, ringing in the ears. For prevention purposes, perform morning and evening, and in the afternoon.
Back
Video
Related Posts
 Botox vs. Dermal Fillers: Weighing the Pros and Cons
- What should be done to get rid of tendonitis in foot?
- Top-15 Most Effective Exercises for All Main Body Muscles
- How to get rid of stomach cramping at home
- Top-5 Most Dangerous Consequences of a Sedentary Lifestyle and Effective Ways of Their Prevention
- Best ways how to get rid of menstrual cramps immediately